Back Up Your Private 1Password to HashiCorp Vault
For years now, I’ve kept all my passwords in a private Vault instance on my home server that I need VPN access to get into. This works fine and I take a backup with me when I’m traveling. I’m getting married though and needed to assess my fiance’s security practices. Am I going to get her to jump through the weird series of hoops I go through to protect my data? Okay, I guess I’ll get us a more pragmatic solution.
In case you don’t know what either of these things are:
- 1Password is a consumer and business secrets management solution. I chose it over other platforms for its reputation, well supported Linux client, developer friendly features, and that it will auto-fill everything on her new phone without me needing to help.
- Vault is a self hosted enterprise secrets management solution. Despite how I was using it, it’s not really a personal password manager, rather it’s meant for storing sensitive data used by your production applications and injecting them where needed.
The reason for this experiment and subsequent post is simply that I am storing my data on someone else’s servers now and would like to retain a local versioned copy. Passwords in a spreadsheet just isn’t my style.
Okay, let’s get started.
Setup a Vault Server
This is a long topic, so I’m going to point you to other documentation that already covers this.
- My previous post about using Vault to store personal data. This is Linux distro agnostic (assuming systemd) and should still work.
- Official installation page. They have more repositories for different architectures and distributions than they did when I wrote my prior article, so maybe go here.
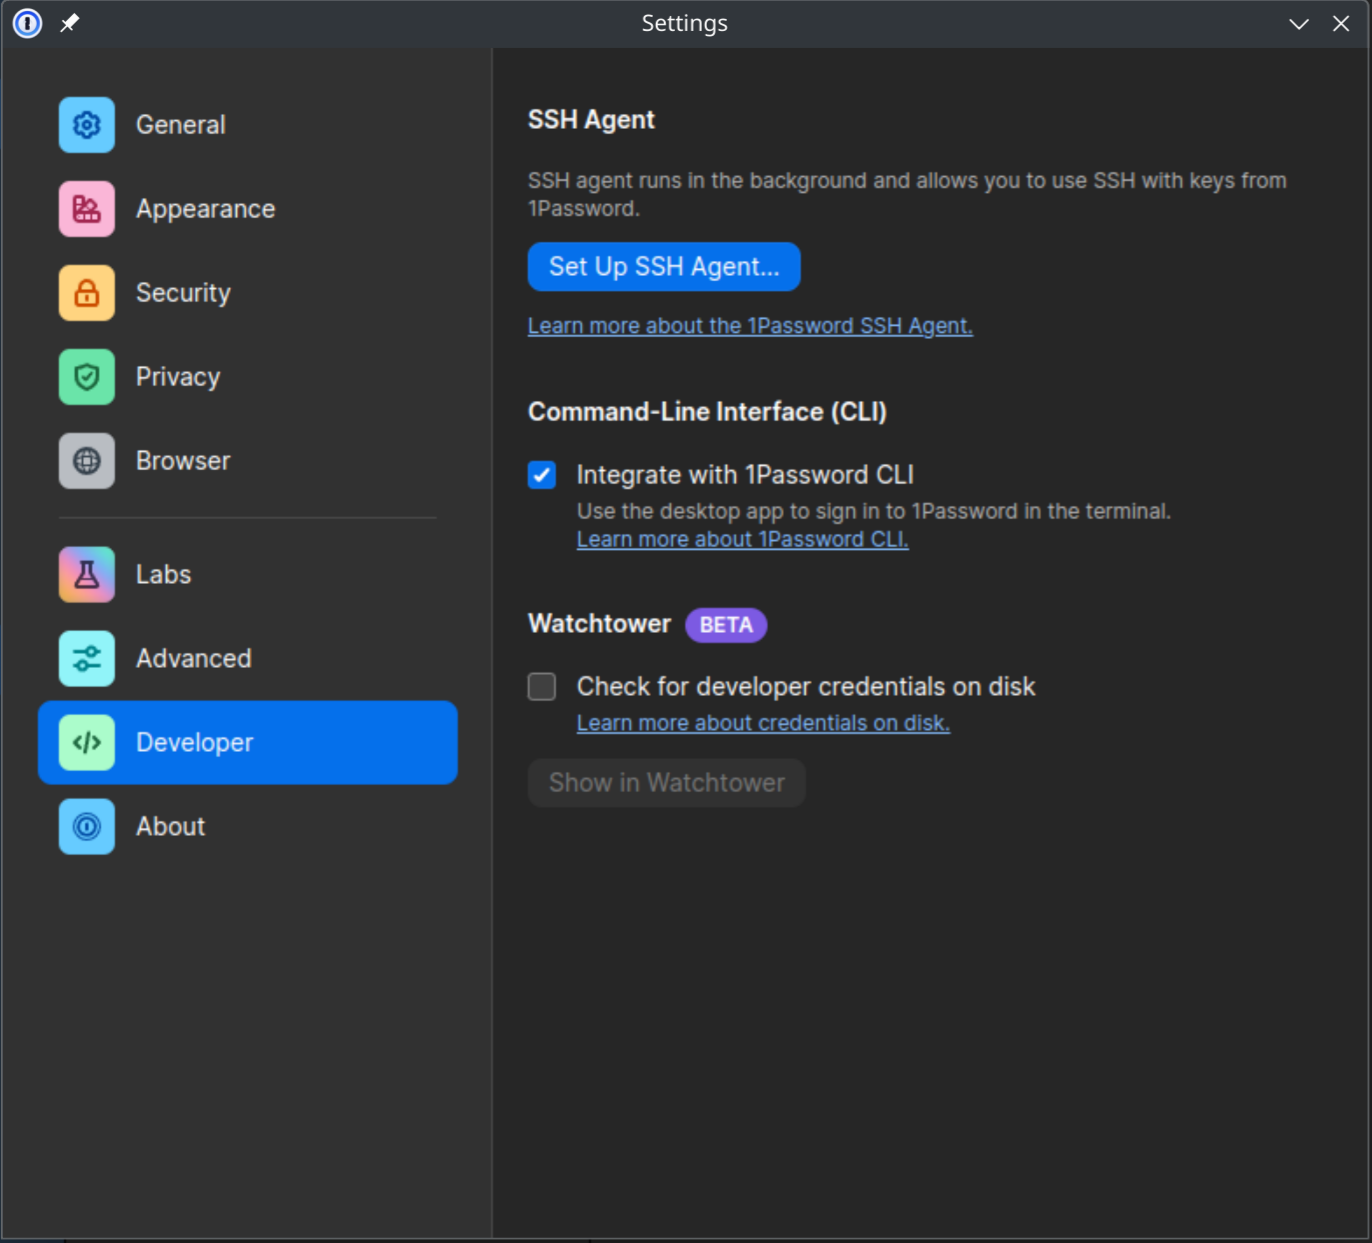
Turn On 1Password Developer Features
In this article I’m assuming you’re already a 1Password user. We need to enable some features you probably don’t typically use in order to get going here.
Install the 1Password-CLI
The above link covers this. In my case (Fedora), already having 1Password’s repo installed, it’s as simple as:
# dnf install 1password-cli
After it’s installed, enable it in the regular client under Settings > Developer > Command-Line Interface > Integrate with 1Password CLI. This makes it so that any scripts you write to interface with 1Password will prompt you in the client for authorization.
Install hvac
hvac is a Python client library for Vault. It’ll provide us a friendly wrapper for the Vault API.
If your distribution has hvac in it’s repositories, I’d suggest getting it from there.
Fedora:
# dnf intall python3-hvac
Otherwise, use pip:
$ pip install hvac
Login to Vault and Create a Mount Point
You’ll need Vault installed on your client machine, not just the server you’re running it on (although both could be the same). This is just for the CLI client which is in the same binary. I’m going to assume you have http://127.0.0.1:8200/ as your address for a local testing environment or https://vault.yourdomain.tld/ if you’ve got the real deal up and running.
First, set the environment variable for the address.
Bash or Zsh:
$ export VAULT_ADDR="https://vault.yourdomain.tld/"
PowerShell:
$Env:VAULT_ADDR = 'https://vault.yourdomain.tld/'
Note: I haven’t actually tested this on Windows.
With that set, you can use the vault login command with whatever method you setup. If you’re just in a testing environment with your root token, this is quick:
% vault login
Token (will be hidden):
Success! You are now authenticated. The token information displayed below
is already stored in the token helper. You do NOT need to run "vault login"
again. Future Vault requests will automatically use this token.
I personally use userpass as a method, as described in my other post.
% vault login -method userpass username=blake
Password (will be hidden):
Success! You are now authenticated. The token information displayed below
is already stored in the token helper. You do NOT need to run "vault login"
again. Future Vault requests will automatically use this token.
Either way saves your token into ~/.vault-token with permissions set to read and write only for you. Be careful with this and revoke if you’re ever worried about it.
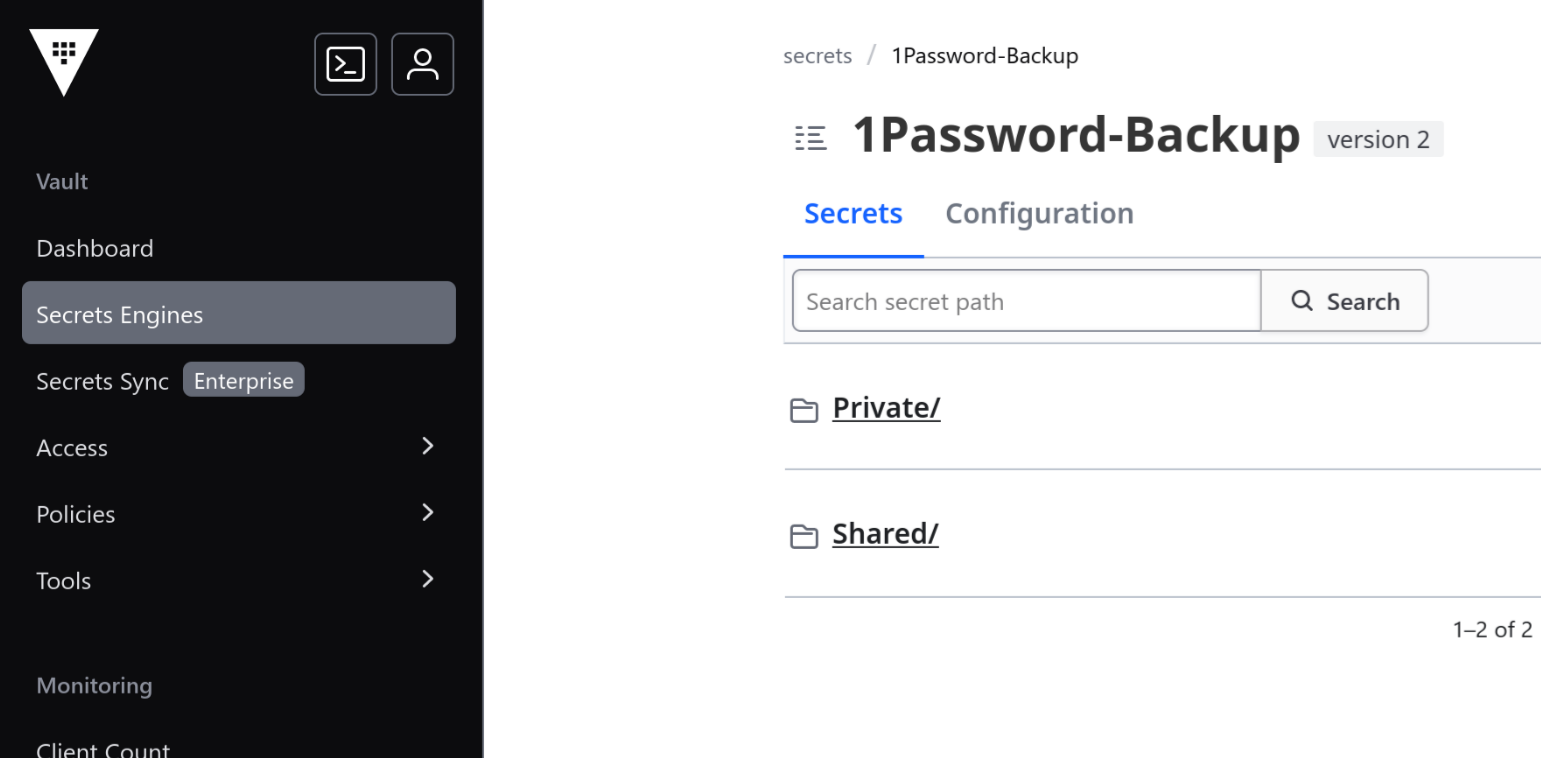
Now we need to create a mount point.
% vault secrets enable -path=1Password-Backup kv-v2
Inspecting the 1Password JSON Output
Although it defaults to human readable output, adding --format json to most of 1Password’s CLI commands will give you something easy to script against.
Let’s take a look at listing all items.
% op item list --format json
[
  {
    "id": "gIbBeRiShHeRe",
    "title": "My Renter's Insurance Website",
    "version": 1,
    "vault": {
      "id": "mOrEgIbBeRiShHeRe",
      "name": "Shared"
    },
    "category": "LOGIN",
    "last_edited_by": "MYUSERIDHERE",
    "created_at": "2024-02-17T02:41:28Z",
    "updated_at": "2024-02-17T02:43:10Z",
    "additional_information": "[email protected]",
    "urls": [
      {
        "label": "website",
        "primary": true,
        "href": "https://my.rentersinsurancewebsite.tld"
      }
    ]
  },
...
This heavily redacted entry has a number of details but not the ones that 1Password has marked as sensitive. A subsequent query using the item id will get the full details.
% op item get gIbBeRiShHeRe --format json
{
  "id": "gIbBeRiShHeRe",
  "title": "My Renter's Insurance Website",
  "version": 1,
  "vault": {
    "id": "mOrEgIbErIsHhErE",
    "name": "Shared"
  },
  "category": "LOGIN",
  "last_edited_by": "MYUSERIDHERE",
  "created_at": "2024-02-17T02:41:28Z",
  "updated_at": "2024-02-17T02:43:10Z",
  "additional_information": "[email protected]",
  "urls": [
    {
      "label": "website",
      "primary": true,
      "href": "https://my.rentersinsurancewebsite.tld"
    }
  ],
  "fields": [
    {
      "id": "username",
      "type": "STRING",
      "purpose": "USERNAME",
      "label": "username",
      "value": "[email protected]",
      "reference": "op://Shared/gIbBeRiShHeRe/username"
    },
    {
      "id": "password",
      "type": "CONCEALED",
      "purpose": "PASSWORD",
      "label": "password",
      "value": "Redacted",
      "reference": "op://Shared/gIbBeRiShHeRe/password",
      "password_details": {
        "strength": "VERY_GOOD"
      }
    },
    {
      "id": "notesPlain",
      "type": "STRING",
      "purpose": "NOTES",
      "label": "notesPlain",
      "reference": "op://Shared/gIbBeRiShHeRe/notesPlain"
    }
  ]
}
I have 2 1Password “Vaults” (confusing in the context of this post), my Private one, and one I share with my fiance. This falls into the latter. Another field you’ll notice is category, this being “LOGIN”. This corresponds to the type of secret.
Writing the Script
So the kv-v2 storage model for Vault is exactly what it sounds like: key-value pairs. You may have noticed 1Password has a little more nuance with the fields. Because of this, we don’t get a complete mirror of the dataset that could be restored, but we have a secure copy of all our logins and passwords in the event that we suddenly can’t log into 1Password (don’t lose that secret key they give you).
Make sure you have VAULT_ADDR set in this shell as well. I commented the following heavily:
#!/usr/bin/python3

import hvac, subprocess, json, sys, os

# Add an absolute path if 1password-cli isn't in your PATH
# Add .exe if on Windows
op = "op"

# Read the vault token file the vault login command generated
with open(f"{os.environ['HOME']}/.vault-token") as f:
    token = f.read().strip()

client = hvac.Client(
    url=os.environ["VAULT_ADDR"],
    token=token,
)

# Quit if login fails.
if not client.is_authenticated():
    print("Could not authenticate.")
    sys.exit(1)

# Get list of all items and parse json into a dict
item_cmd = subprocess.run([op, "item", "list", "--format", "json"],
                          capture_output=True)
if item_cmd.returncode == 0:
    items = json.loads(item_cmd.stdout.decode())
else:
    print(item_cmd.stderr.decode())
    sys.exit(item_cmd.returncode)

# Iterate over items and do work.
for item in items:
    fields = {}
    # This is the path we'll store the secret in in Vault.
    # This uses friendly names which can be changed which would
    # duplicate the secret. You can use 'id' in place of name or title
    # to work around this, but it will be harder to read.
    path = f"{item['vault']['name']}/{item['category']}/{item['title']}"

    # Get the secret payload
    c = subprocess.run([op, "item", "get", item["id"], "--format", "json"],
                        capture_output=True)

    # Move onto the next item if this command fails..
    if c.returncode != 0:
        print(f"ERROR: {path} - ")
        print(c.stderr.decode())
        continue
    i = json.loads(c.stdout.decode())

    for field in i["fields"]:
        # Fields without values will be skipped.
        if "value" in field:
            fields.update({field["label"]: field["value"]})

    # See if the secret already exists, and continue if nothing has changed.
    # The default behavior of create_or_update will create a new version
    # even if there is no difference.
    try:
        existing = client.secrets.kv.v2.read_secret_version(
            mount_point = "1Password-Backup",
            path=path,
            raise_on_deleted_version=False,
        )
        if existing['data']['data'] == fields:
            continue
    except:
        pass

    # This will create a secret or create a new version of
    # the secret if you've changed a value.
    cr = client.secrets.kv.v2.create_or_update_secret(
        mount_point = "1Password-Backup",
        path=path,
        secret=fields,
    )

    # Just informational output.
    print(f"{path} - Warnings: {cr['warnings']}")
This is honestly some of the simplest Python code I’ve ever written and I spent about 20 minutes on it. I was expecting this to be a far more laborious process. You’ll probably want to expand upon this for your own personal needs. For example, this will not fetch stored documents (but it will get secure notes).
Browsing Vault After Import
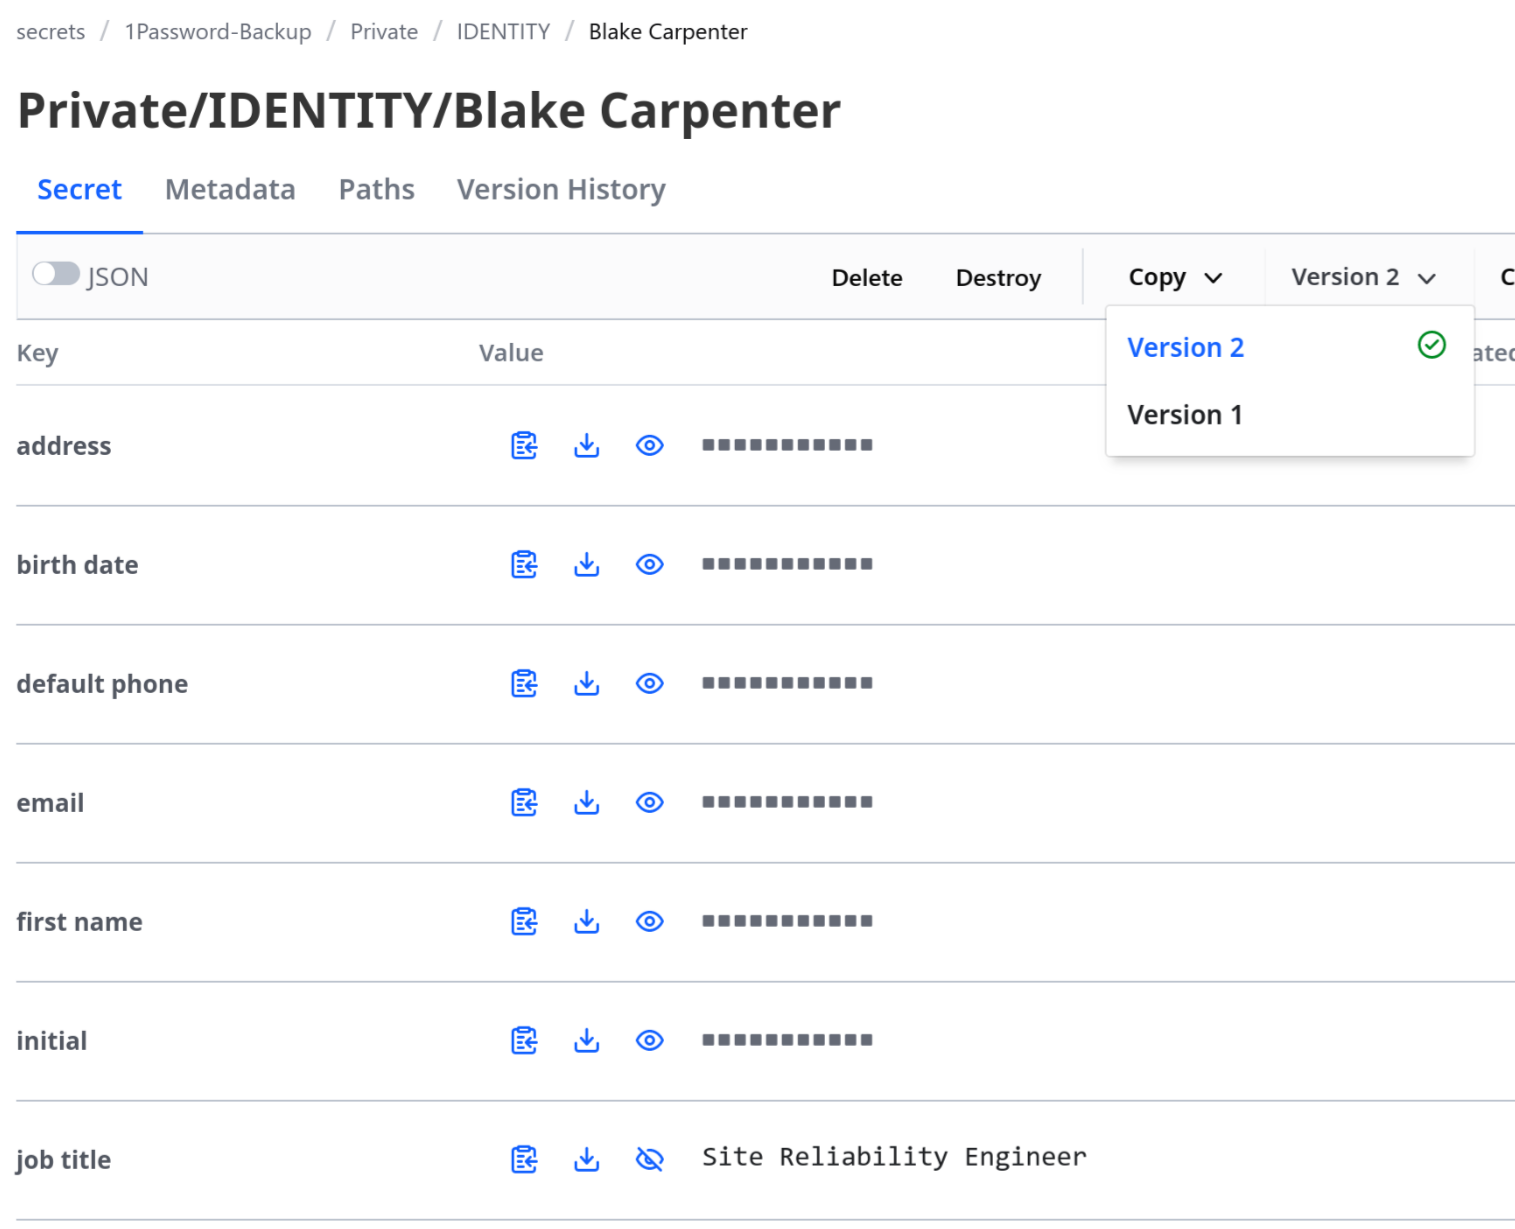
If you have the Vault UI enabled (and all of your DevOps friends are making fun of you), it’s easy to browse through and see where everything mapped in. With the way I wrote it, the path structure is 1Password-Backup/Store Name/Secret Type/Secret Name.
Versioned Changes
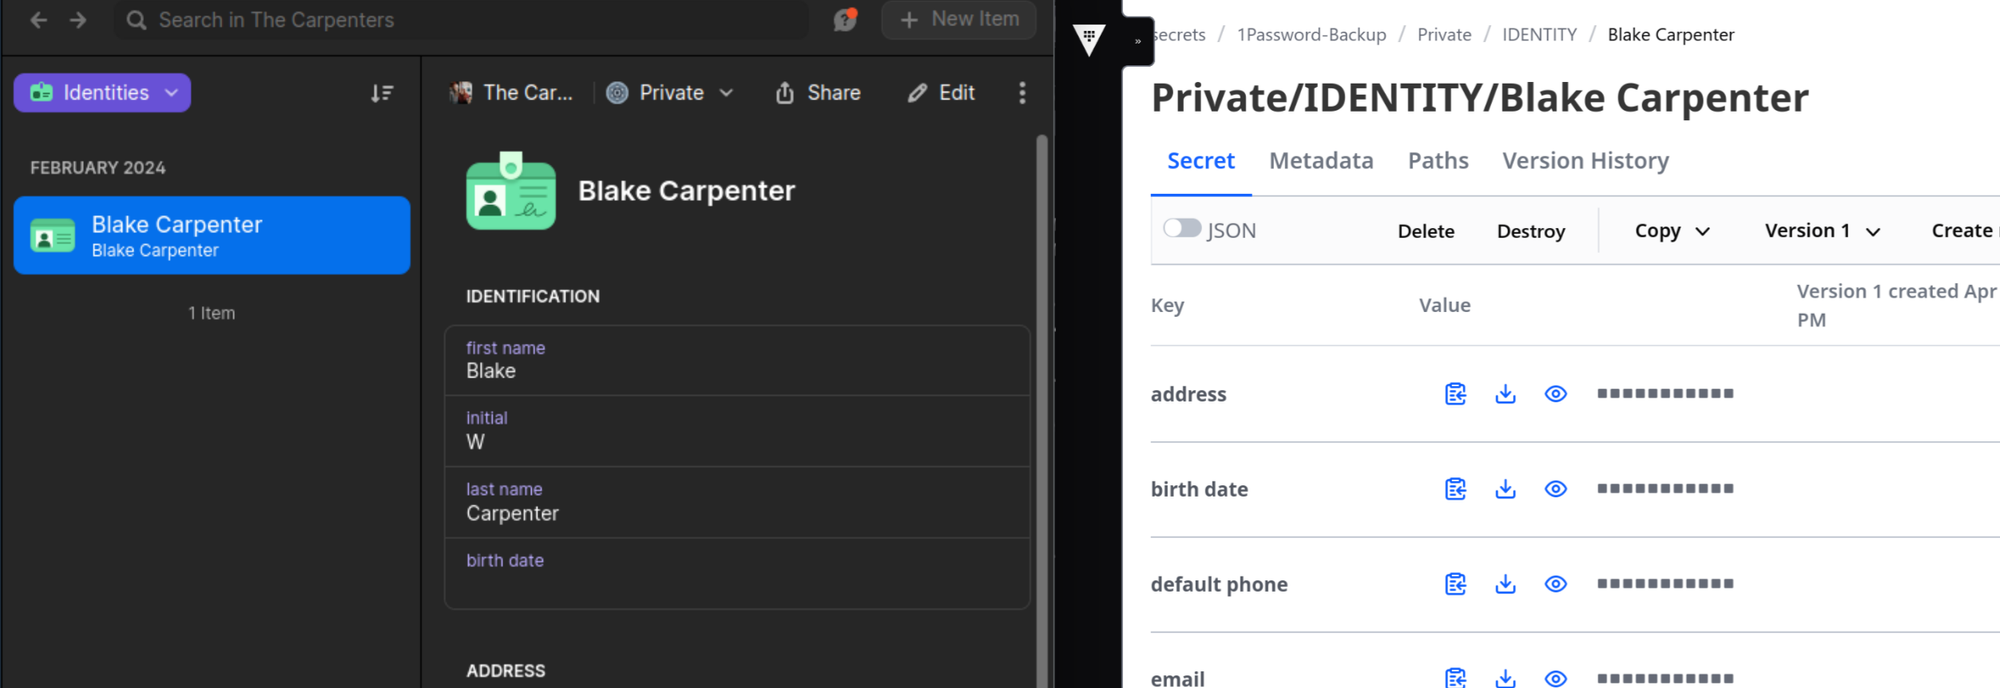
The hvac function we used should update an existing secret, and Vault should keep multiple versions using kv-v2. So let’s try adding a field to that identity item above and run the script again.

Here I’ve added my job title. Now when we run the script again, we should get a new version in Vault.
% python 1pass2vault.py
Private/IDENTITY/Blake Carpenter - Warnings: None
Conclusion
This basic example likely serves as a starting point. Do you want to be able to restore to 1Password? Do you want to adjust your key labels or add additional keys in order to retain the additional metadata 1Password has? Do you want to scope items being read?
The following documentation from the projects we used here today should help get you going.