Deploy a Fleet of FreeBSD Linodes
Akamai does not officially support FreeBSD on Linodes at this time. This article is for fun and it is not recommended to run production workloads this way. Also, I did this experiment on my own time, on my own account, with my own computer, and I don’t provide any warranty either.
Follow up disclaimer: know what Linodes cost before Terraforming stuff.
Before we start, let’s draw attention to this Linode blog post about the manual process of getting FreeBSD to run on a Linode. I ran my personal blog this way for a few years before switching to Debian. I switched because I wanted all my personal cloud resources managed in Terraform, and I couldn’t automatically spin up what you see in that blog post.
Or can I?
I can!
This article is going to be hyper-specific to how I did it. My personal workstation is running on Fedora and had everything I needed to do this out of the box. It should serve as a rough demonstration more than a how-to, so prepare to tinker if you want to mass deploy FreeBSD on Akamai Cloud yourself.
I’m also assuming that you already know what FreeBSD, Terraform/OpenTofu, Ansible, and Linodes are. I suppose this makes this my most esoteric post.
Create a Custom FreeBSD Image
Akamai will allow you to upload custom virtual machine images in RAW format. You can also gzip it to save space (this hastens the upload, but I think you still pay for uncompressed size). The cost is 10 cents per gigabyte, so you’ll hardly notice. The purpose of this feature is usually so that you can pre-configure a supported operating system, but as it is, I got it working with an unsupported one.
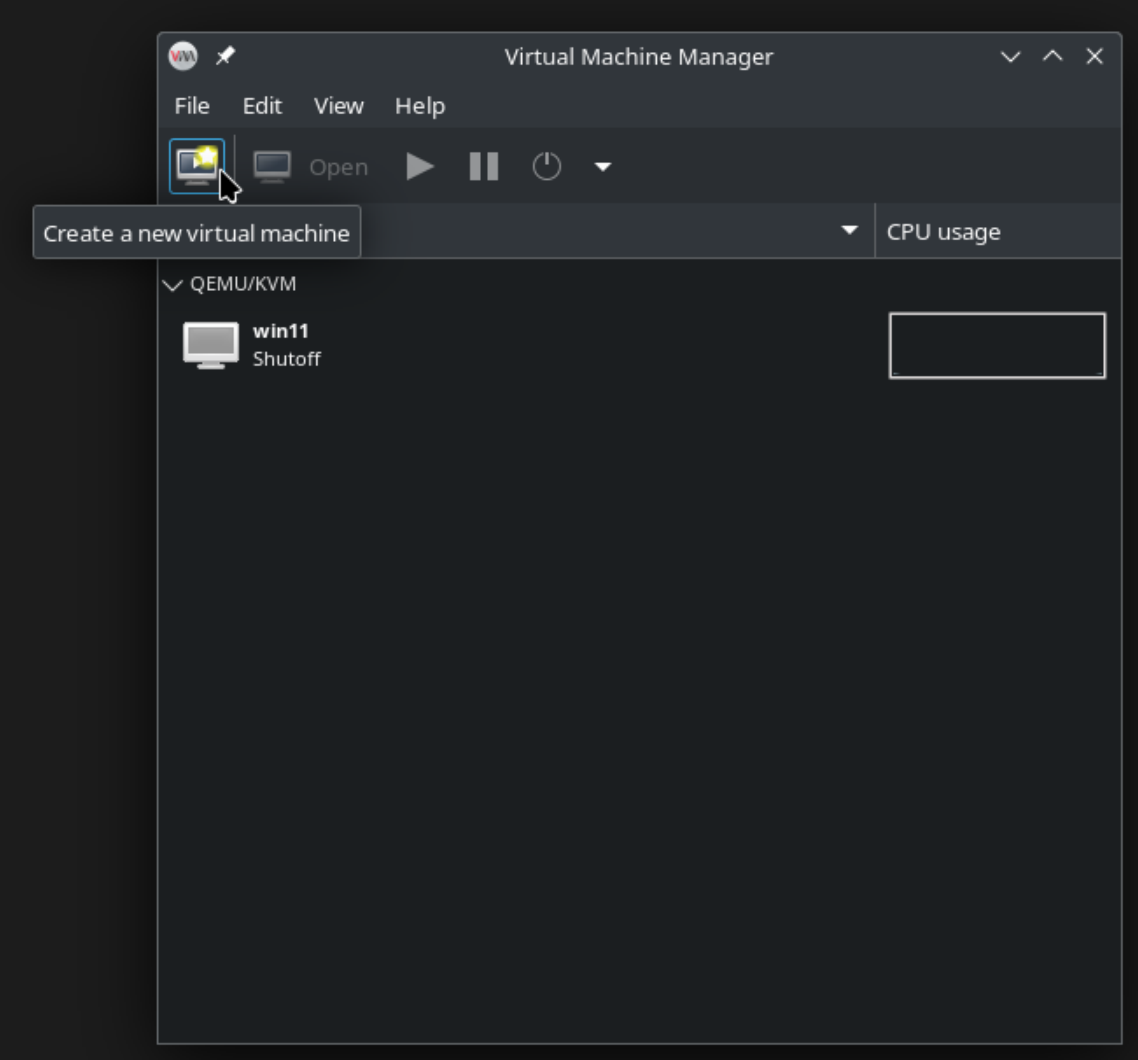
If you’re a Linux user, you’ll want to install and configure libvirt and qemu with the kvm module. You can find these in the repositories of almost any distro. To make life easy, we’ll also install virt-manager in order to interact with our VMs.
Grab a copy of FreeBSD 14.
sudo cd /var/lib/libvirt/images
sudo wget https://download.freebsd.org/releases/amd64/amd64/ISO-IMAGES/14.0/FreeBSD-14.0-RELEASE-amd64-bootonly.iso
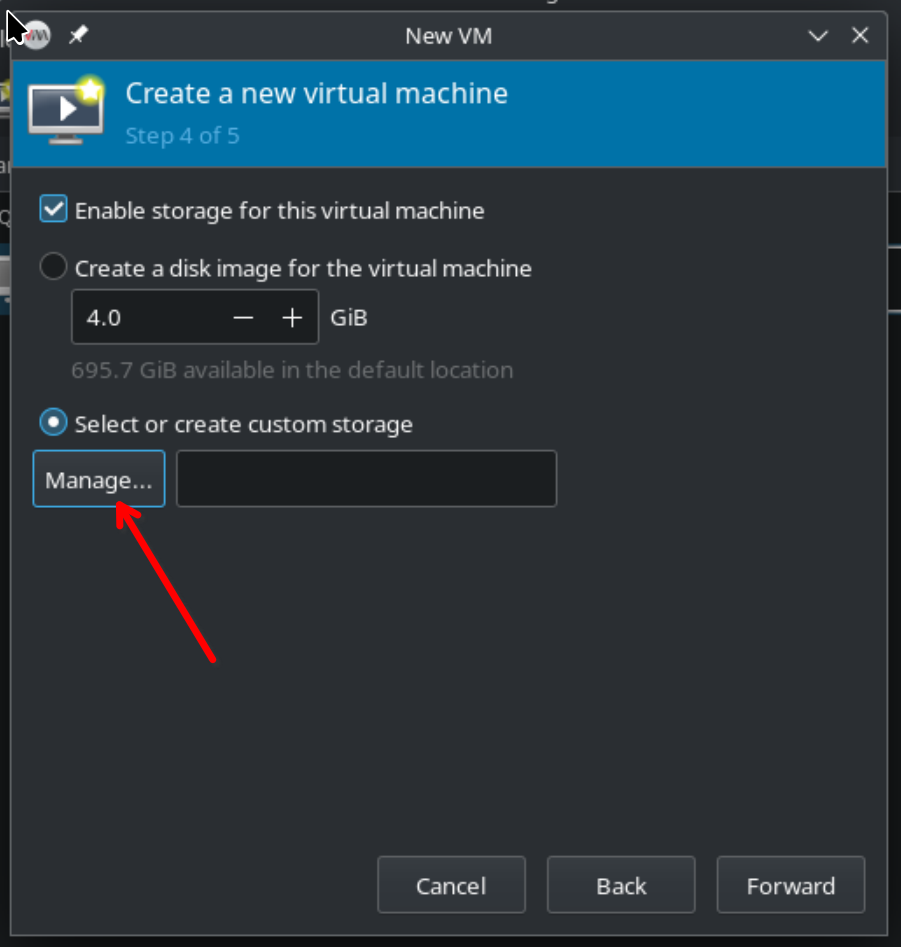
We’re going to create a virtual machine now with a 4GB disk in RAW format.
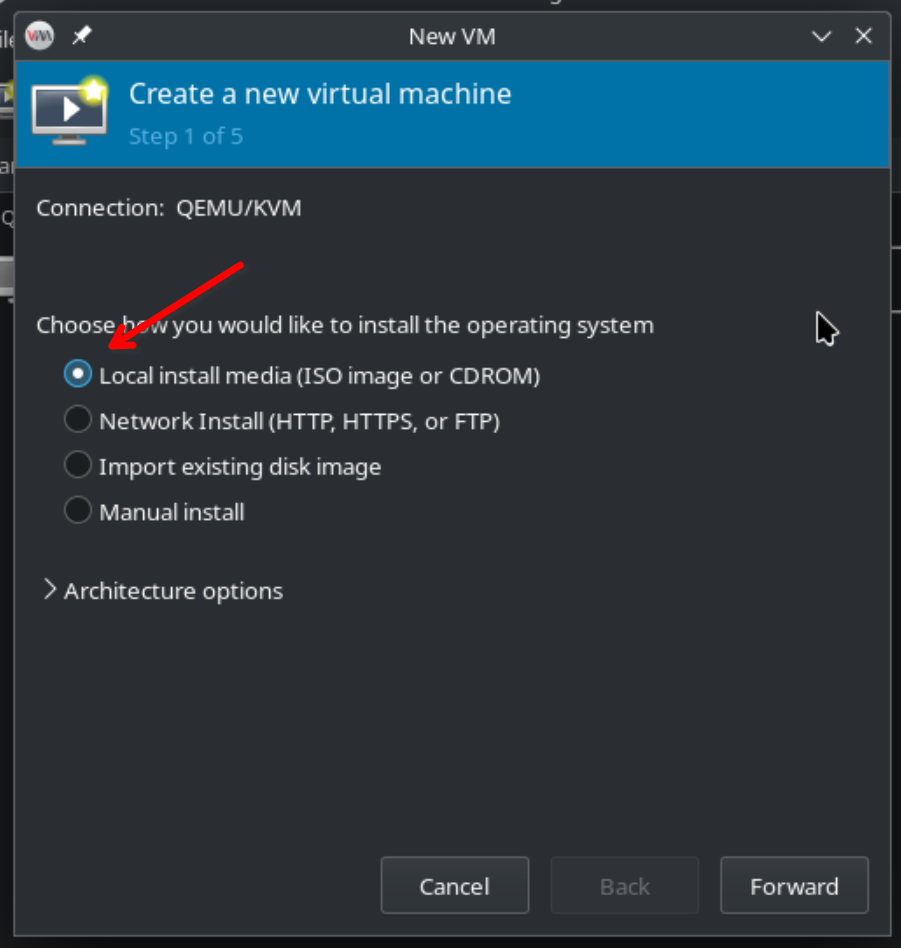

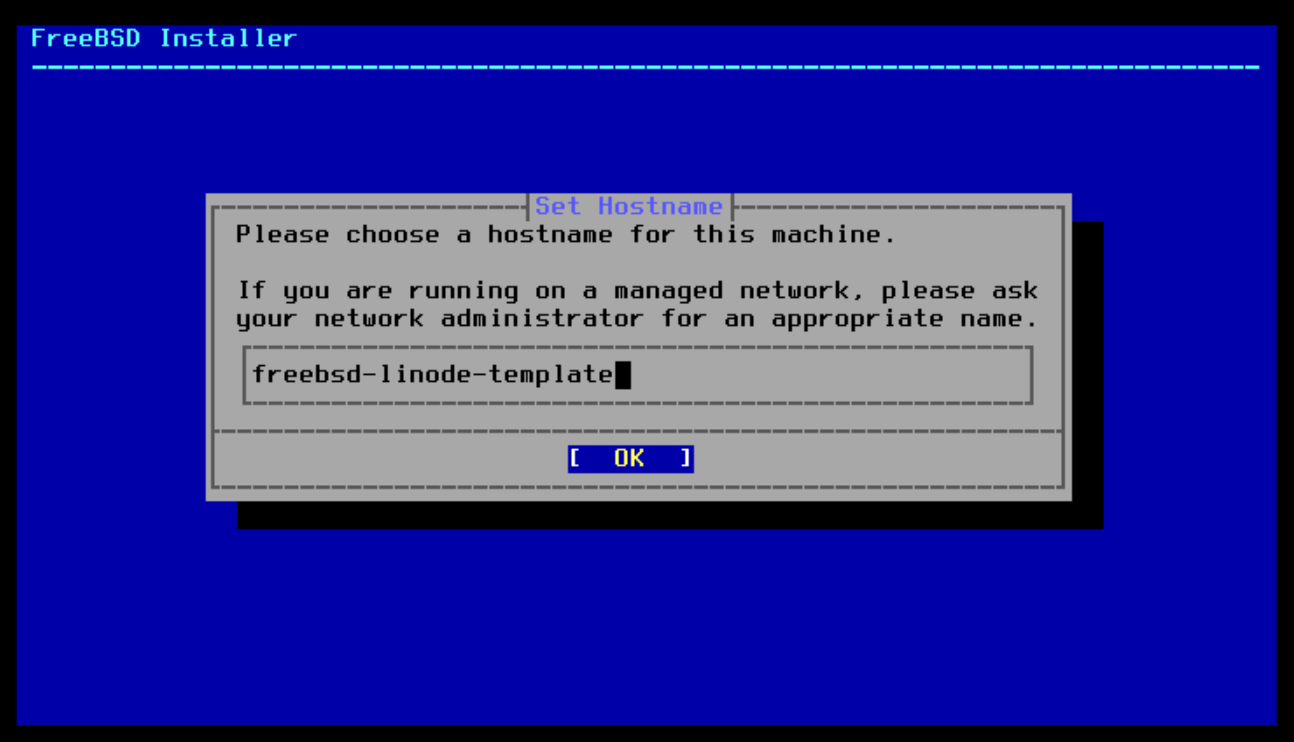
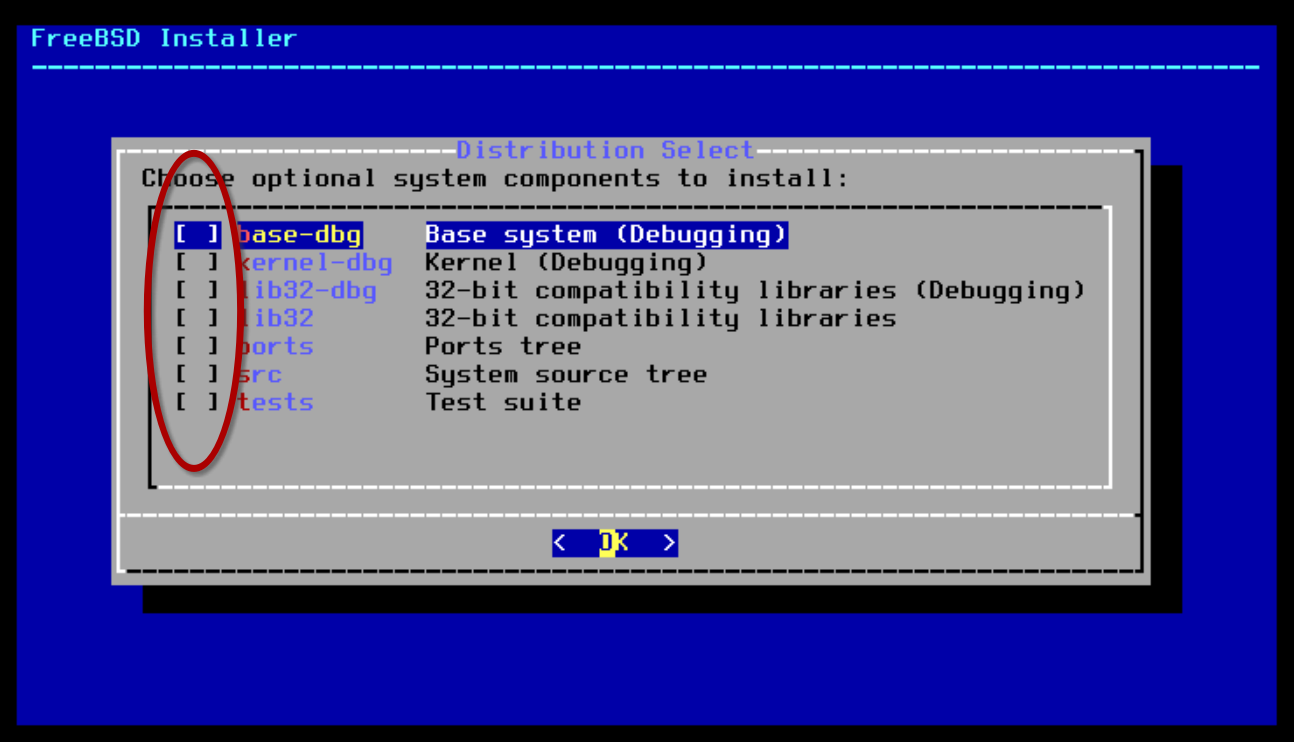
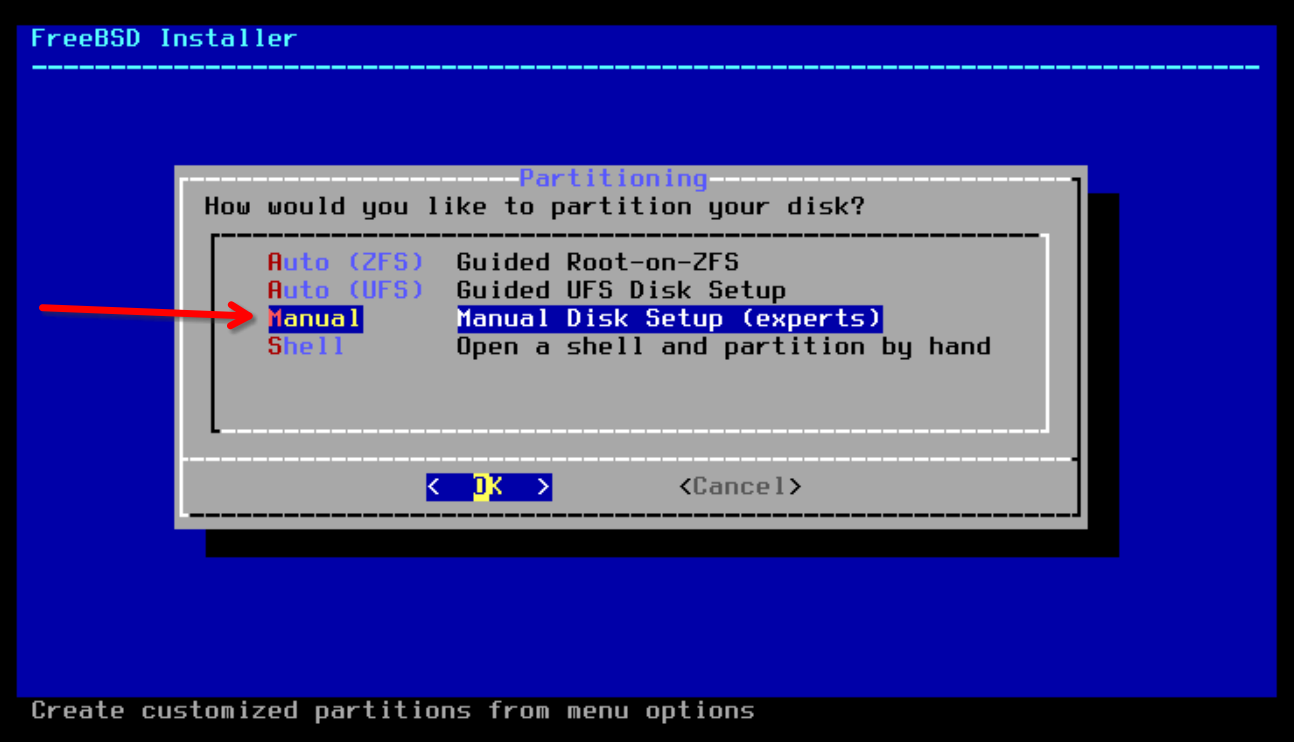
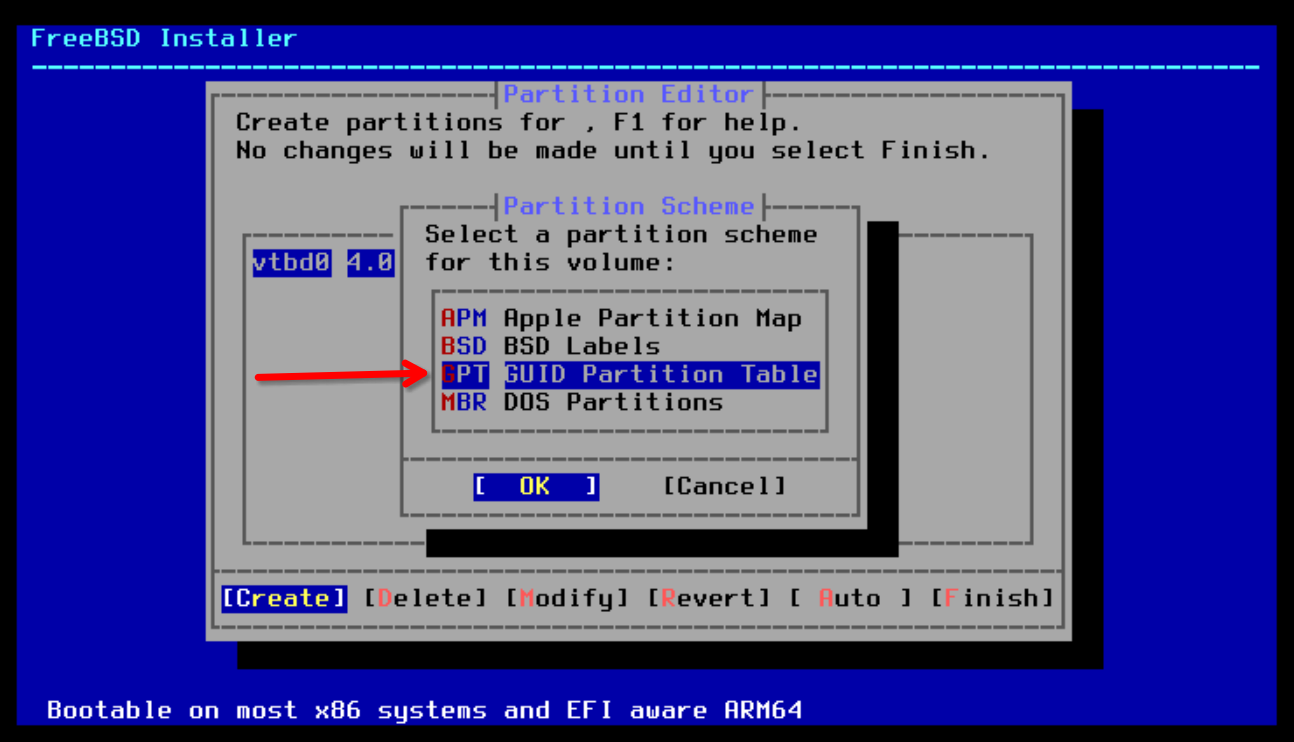
Click through the defaults from here until it boots. Once in the installer, you will mostly select the defaults, but uncheck all optional components. We’re going to do a manual configuration of the disk with a 512KB freebsd-boot partition and allocate the rest of the space to a UFS partition mounted at /. Why not ZFS? Because that’s only really recommended for machines with large amounts of memory. You can always make a second image for your larger Linodes, though! Note that the partition labels are important and will be used later.


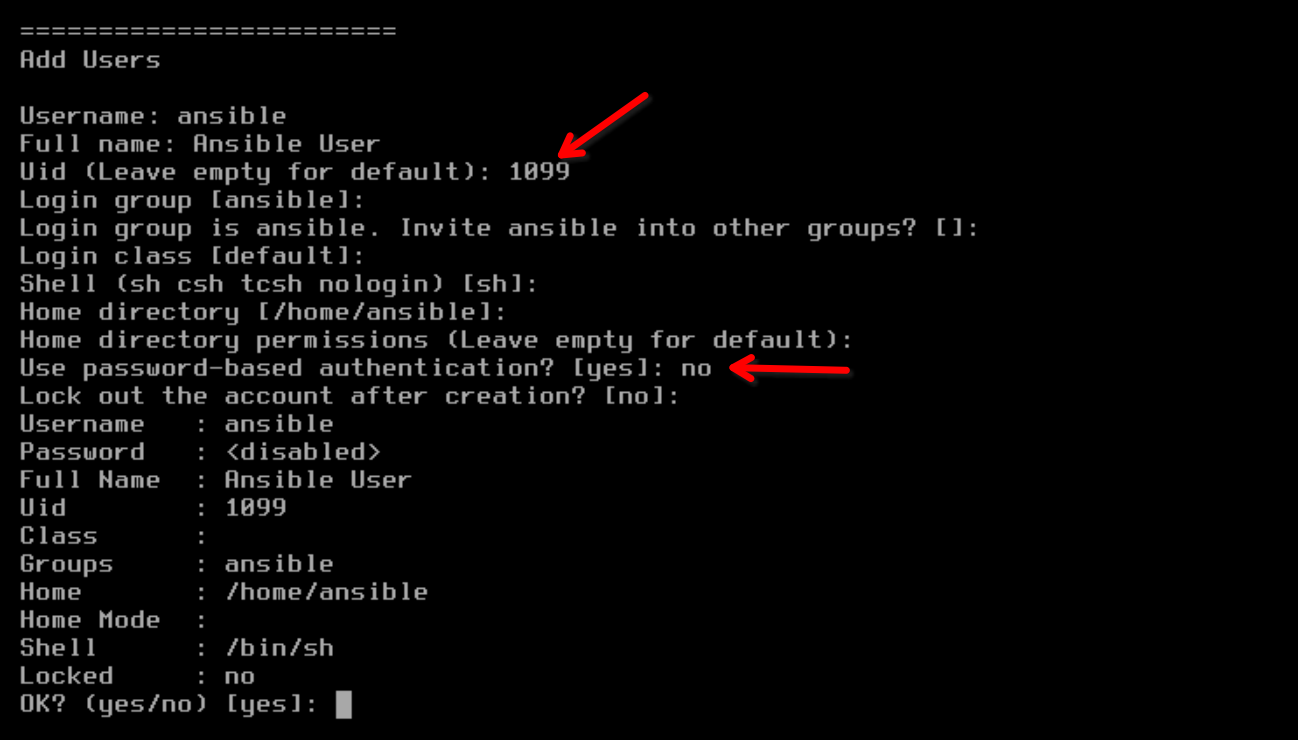
We need to create a user for Ansible. We’ll use 1099 for the UID because you’re probably used to your own account being 1000 or 1001. We also won’t set a password so this account only logs in with an ssh key.
Finish the installation and reboot the VM. Now we can log into it and get it into a template state that we want all of our FreeBSD Linodes to start with.
When it boots up, go ahead and enable root login (and probably disable it again later) just so we can ssh in locally and have a friendlier terminal, then find its local IP address.
echo "PermitRootLogin yes" >> /etc/ssh/sshd_config
service sshd restart
ifconfig
Okay, ssh in as root and do all your prep work. Let’s perhaps start with making an ssh key for Ansible.
root@:~ # su - ansible
ansible@:~ $ ssh-keygen -t ecdsa -b 521
Generating public/private ecdsa key pair.
Enter file in which to save the key (/home/ansible/.ssh/id_ecdsa):
Created directory '/home/ansible/.ssh'.
Enter passphrase (empty for no passphrase):
Enter same passphrase again:
Your identification has been saved in /home/ansible/.ssh/id_ecdsa
Your public key has been saved in /home/ansible/.ssh/id_ecdsa.pub
Copy the private key to your local machine, and then make the public key an authorized key.
ansible@:~ $ cat .ssh/id_ecdsa
-----BEGIN OPENSSH PRIVATE KEY-----

ansible@:~ $ rm .ssh/id_ecdsa
ansible@:~ $ mv .ssh/id_ecdsa.pub .ssh/authorized_keys
ansible@:~ $ chmod 600 .ssh/authorized_keys
We at least have to install python and sudo. You can add any other packages you’ll want across all systems while we’re here. Ctrl+D to get back to root and then:
root@:~ # pkg install sudo python emacs-nox
Create a sudoer entry for ansible and test it.
root@:~ # echo "ansible ALL=(ALL) NOPASSWD: ALL" > /usr/local/etc/sudoers.d/ansible
root@:~ # chmod 400 /usr/local/etc/sudoers.d/ansible
root@:~ # su ansible
ansible@:/root $ sudo echo test
test
ansible@:/root $
Create /boot/loader.conf if it does not exist and add the following lines to it. This is for using the lish console in the cloud management portal.
boot_multicons="YES"
boot_serial="YES"
comconsole_speed="115200"
console="comconsole,vidconsole"
We need to fix /etc/fstab. This used the virtual disk device name, which won’t be the same in a Linode. Change it to the friendly label version we made in order for it to boot.
# Device Mountpoint FStype Options Dump Pass#
/dev/gpt/freebsd-root / ufs rw 1 1
Finally, go back and remove the root login permission from /etc/ssh/sshd_config, and perhaps also configure it to not allow password authentication (PasswordAuthentication no). This means when these boot up, only the ansible user will be able to login, and only with the key you created.
Prepare Your Local Environment
Weird things coming:
- I’m using OpenTofu instead of regular Terraform. It’s a fork, and all examples here are agnostic between the two. Just use “terraform” in place of “tofu” if you’re using the real thing.
- Cloudflare is my personal DNS provider (but not a sponsor or affiliate), so I’m having tofu configure DNS entries for me. Look to see if your DNS provider is supported by Terraform. It has providers for nearly everything.
dnf install opentofu ansible
Generate an API key for your Linode user and add it to your environment variables.
CLOUDFLARE_API_TOKEN="redacted"
LINODE_TOKEN="redacted"
LINODE_CLI_TOKEN=$LINODE_TOKEN
export CLOUDFLARE_API_TOKEN LINODE_TOKEN LINODE_CLI_TOKEN
Alright, now with your VM powered off, copy and compress the disk image.
sudo dd if=/var/lib/libvirt/images/freebsd-linode-template.img | gzip -c | dd of=/home/blake/freebsd-linode-template.img.gz
Tofu’ing the Linodes
Create a folder named something obvious like tofu or terraform. To start, let’s just have a main.tf and nothing else. Add the Linode provider and whatever other provider you need for this project.
My examples use Cloudflare for DNS, all references to which should be omitted if you’re following along but don’t use it.
terraform {
  required_providers {
    linode = {
      source = "linode/linode"
    }
    cloudflare = {
      source = "cloudflare/cloudflare"
    }
  }
}
Change into this directory and initialize.
tofu init
We now have a working tofu/terraform environment! Your first task is to upload your custom image. In my example, we’re putting the file we saved in Newark. Don’t worry, it’s accessible from anywhere, you just want to keep it close to your most common deployments. Move your image into a subfolder called disk_images and add the following to main.tf:
resource "linode_image" "freebsd14" {
  label = "freebsd14.0"
  description = "FreeBSD 14.0 Configured for Ansible"
  region = "us-east"

  file_path = "disk_images/freebsd-linode-template.img.gz"
}
Apply this and you should see it ready to upload the image.
% tofu apply

OpenTofu used the selected providers to generate the following execution plan. Resource actions are
indicated with the following symbols:
  + create

OpenTofu will perform the following actions:

  # linode_image.freebsd14 will be created
  + resource "linode_image" "freebsd14" {
      + capabilities = (known after apply)
      + cloud_init = false
      + created = (known after apply)
      + created_by = (known after apply)
      + deprecated = (known after apply)
      + description = "FreeBSD 14.0 Configured for Ansible"
      + expiry = (known after apply)
      + file_hash = "8e0b6c87b8eff97adc2adf82a282b856"
      + file_path = "disk_images/freebsd-linode-template.img.gz"
      + id = (known after apply)
      + is_public = (known after apply)
      + label = "freebsd14.0"
      + region = "us-east"
      + size = (known after apply)
      + status = (known after apply)
      + type = (known after apply)
      + vendor = (known after apply)
    }

Plan: 1 to add, 0 to change, 0 to destroy.

Do you want to perform these actions?
  OpenTofu will perform the actions described above.
  Only 'yes' will be accepted to approve.

  Enter a value: yes
...
Alright! We have our image ready to deploy! Can we just casually start deploying Linodes with it? Well, not really. Most of the default features of a Linode will break (again, unsupported) so they need to be disabled. Because of this, we need to create a config resource to go with our instance resource.
Well, we also want a lot of these and this gets rather verbose, so let’s make a module. Create the following path within your tofu folder: modules/freebsd-deployment
Create a file in this folder called variables.tf and fill it out accordingly. If you’re new to Terraform, this sets the defaults for the module which can be overridden when writing the main config.
variable "image" {
  description = "Image to use for Linode instance"
  default = "linode/ubuntu18.04"
}

variable "label" {
  description = "The Linode's label is for display purposes only, but must be unique."
  default = "default-linode"
}

variable "region" {
  description = "The region where your Linode will be located."
  default = "us-east"
}

variable "type" {
  description = "Your Linode's plan type."
  default = "g6-standard-1"
}

variable "cloudflare_zone" {
  description = "Cloudflare Zone ID for DNS Configuration"
  default = ""
}
Variable descriptions are borrowed from the Linode doc on Terraform modules.
Now, create a main.tf in this folder with the following.
resource "linode_instance" "freebsd_instance" {
  label = var.label
  region = var.region
  type = var.type
  boot_config_label = "freebsd"
}

resource "linode_instance_disk" "freebsd_boot" {
  label = "boot"
  linode_id = linode_instance.freebsd_instance.id
  size = linode_instance.freebsd_instance.specs.0.disk
  image = var.image
  filesystem = "raw"
}

resource "linode_instance_config" "freebsd_config" {
  linode_id = linode_instance.freebsd_instance.id
  label = "freebsd"
  kernel = "linode/direct-disk"
  root_device = "/dev/sda"
  run_level = "default"
  virt_mode = "paravirt"
  booted = true

  device {
    device_name = "sda"
    disk_id = linode_instance_disk.freebsd_boot.id
  }

  helpers {
    devtmpfs_automount = false
    distro = false
    modules_dep = false
    network = false
    updatedb_disabled = false
  }
}

resource "cloudflare_record" "freebsd_ipv4" {
  zone_id = var.cloudflare_zone
  name = var.label
  value = linode_instance.freebsd_instance.ip_address
  type = "A"
  proxied = false
  ttl = 1
}

resource "cloudflare_record" "freebsd_ipv6" {
  zone_id = var.cloudflare_zone
  name = var.label
  value = trimsuffix(linode_instance.freebsd_instance.ipv6, "/128")
  type = "AAAA"
  proxied = false
  ttl = 1
}
Let’s talk about some odds and ends here. You can deploy a lot of Linodes just using the linode_instance resource when it comes to supported operating systems. Since a custom FreeBSD deployment is weird, we need a more verbose linode_instance_config to go with it and a linode_instance_disk to go into that. In our config, we have disabled all helpers because none of them will work. We’ve put direct-disk for the kernel so Linode won’t try to boot one of its own, and we’ve set the filesystem as raw so the provisioner won’t try to run filesystem commands against it. Finally, in the two Cloudflare entries you can see how Tofu/Terraform excel at multicloud; I’m able to reference one provider’s resources in another.
Alright, now that we’ve done that, here’s what my main.tf in the root looks like:
terraform {
  required_providers {
    linode = {
      source = "linode/linode"
    }
    cloudflare = {
      source = "cloudflare/cloudflare"
    }
  }
}

resource "cloudflare_zone" "blakecarpenter_dev" {
  account_id = "redacted"
  zone = "blakecarpenter.dev"
}

resource "linode_image" "freebsd14" {
  label = "freebsd14.0"
  description = "FreeBSD 14.0 Configured for Ansible"
  region = "us-east"
  file_path = "disk_images/freebsd-linode-template.img.gz"
}

module "freebsd-1" {
  source = "./modules/freebsd-deployment"
  image = linode_image.freebsd14.id
  label = "freebsd-demo-1"
  region = "us-east"
  type = "g6-standard-2"
  cloudflare_zone = cloudflare_zone.blakecarpenter_dev.id
}

module "freebsd-2" {
  source = "./modules/freebsd-deployment"
  image = linode_image.freebsd14.id
  label = "freebsd-demo-2"
  region = "us-lax"
  type = "g6-standard-2"
  cloudflare_zone = cloudflare_zone.blakecarpenter_dev.id
}

module "freebsd-3" {
  source = "./modules/freebsd-deployment"
  image = linode_image.freebsd14.id
  label = "freebsd-demo-3"
  region = "se-sto"
  type = "g6-standard-2"
  cloudflare_zone = cloudflare_zone.blakecarpenter_dev.id
}
Here we are using our newly created module to provision FreeBSD Linodes in 3 different regions without having to define all that config repeatedly. (Note: you’ll need to import that cloudflare_zone resource if you’re using it).
All 3 of these take image as an option. Version your images, that is; do not upload a new image under the same resource. Why? All 3 of these deployments would get replaced if you did. If you were to create a new FreeBSD 14.1 image, but your 14.0 Linodes are still running, add it as a new image resource for new Linodes that you are creating and specify image accordingly.
A new module means you have to do an init before applying. Then when you run the apply you should see 3 Linodes create in different regions and, in this case, DNS records provision as well.
% tofu init -upgrade
% tofu apply
cloudflare_zone.blakecarpenter_dev: Refreshing state... [id=redacted]
linode_image.freebsd14: Refreshing state... [id=redacted]

OpenTofu used the selected providers to generate the following execution plan. Resource actions are
indicated with the following symbols:
  + create

OpenTofu will perform the following actions:

  # module.freebsd-1.cloudflare_record.freebsd_ipv4 will be created
  + resource "cloudflare_record" "freebsd_ipv4" {
      + allow_overwrite = false
...
  # module.freebsd-3.linode_instance_disk.freebsd_boot will be created
  + resource "linode_instance_disk" "freebsd_boot" {
      + created = (known after apply)
      + filesystem = "raw"
      + id = (known after apply)
      + image = "redacted"
      + label = "boot"
      + linode_id = (known after apply)
      + size = (known after apply)
      + status = (known after apply)
      + updated = (known after apply)
    }

Plan: 15 to add, 0 to change, 0 to destroy.

Do you want to perform these actions?
  OpenTofu will perform the actions described above.
  Only 'yes' will be accepted to approve.

  Enter a value: yes
Alright, now that that’s finished, I can see them in the cloud manager.

Note: you might see disk resize errors, they’re benign, you just deployed virtual machines with an unsupported filesystem. We’ll fix the partition table and filesystem ourselves shortly.
Prepare Ansible
Ansible uses SSH to configure remote hosts. Associate the key and user you made earlier with the new hosts. This is in my ~/.ssh/config:
Host freebsd-demo*.blakecarpenter.dev
      IdentityFile ~/.ssh/ansible-freebsd-linode
      user ansible
Create an ansible folder now. Inside that folder, create 4 other folders, files, group_vars, inventory, and scripts.
Create the file inventory/hosts:
[freebsd]
freebsd-demo-1.blakecarpenter.dev
freebsd-demo-2.blakecarpenter.dev
freebsd-demo-3.blakecarpenter.dev
Here we have a single group with the 3 Linodes I just provisioned. In order for the ansible user to be able to execute commands as root, create group_vars/freebsd:
---
ansible_become: true
In files, put anything you want to copy onto the server. In my case, I have a .zshrc file tuned for these hosts that I will be copying into my home folder.
In the scripts folder, create a file called resize_partition.sh with the following contents:
#!/bin/sh

set -e

# If this hasn't been run yet, da0 will be listed as "CORRUPT"
if gpart list | grep -q 'state: CORRUPT'; then

    gpart recover da0
    gpart resize -i 2 da0

    growfs -y /dev/gpt/freebsd-root

fi
The above script is a starting point that you are free to modify. Want more partitions? Want swap space? man gpart.
Create bootstrap-linode-freebsd.yaml and enter all the tasks needed to make your new hosts ready. We’ll run that script against all of them first.
- name: Bootstrap FreeBSD Linodes
  hosts: freebsd

  tasks:
    - name: Resize filesystem
      script: scripts/resize_partition.sh
      args:
        executable: /bin/sh
    - name: Set the hostname
      hostname:
        name: ""
    - name: Install additional packages
      package:
        name:
          - eza
          - zsh
          - emacs-nox
    - name: Add myself as a user
      user:
        name: blake
        uid: 1000
        home: /home/blake
        shell: /usr/local/bin/zsh
    - name: Copy zsh config
      copy:
        src: files/.zshrc
        dest: /home/blake/.zshrc
        owner: blake
        group: blake
        mode: '0600'
    - name: Add myself to sudoers
      lineinfile:
        path: /usr/local/etc/sudoers.d/blake
        line: 'blake ALL=(ALL:ALL) ALL'
        owner: root
        group: wheel
        mode: '0400'
        create: true
    - name: Add an authorized key
      authorized_key:
        user: blake
        state: present
        key: ecdsa-sha2-nistp521 redacted
Alright, now if we execute this command in the root of the ansible folder, our Linodes should be setup.
% ansible-playbook -i inventory bootstrap-linode-freebsd.yaml

PLAY [Bootstrap FreeBSD Linodes] *********************************************************************

TASK [Gathering Facts] *******************************************************************************
...
PLAY RECAP *******************************************************************************************
freebsd-demo-1.blakecarpenter.dev : ok=0 changed=11 unreachable=0 failed=0 skipped=0 rescued=0 ignored=0
freebsd-demo-2.blakecarpenter.dev : ok=0 changed=11 unreachable=0 failed=0 skipped=0 rescued=0 ignored=0
freebsd-demo-3.blakecarpenter.dev : ok=0 changed=11 unreachable=0 failed=0 skipped=0 rescued=0 ignored=0
Conclusion
It works! Now if I ever get tired of Linux, I can use the same tools to switch.